Hello!
This week has been about modelling faces. We talked about different methods of creating facial meshes and theoretical about edge-flow and topology for facial projects.
One faster and simpler ways of convert real life object to digital 3D meshes is by scanning them by simply photograph the object from all the right, necessary and different angles. The photos need to cover all of the faces, edges and angles that you want to have on your 3D mesh later on.
When all photos are taken, upload them on to your computer and open them in a 3D scanning program. We used the Autodesk 123D Catch as it is a great program that will scan your photos for free. What the program does is that it takes all of your photos and arranges them in a 3D space which then creates a 3D mesh of the photographed object. It also gives you a texture map for your object created from the photos as well.
At the motion capture studio in school we took photos of our own faces for converting them to 3D meshes by using the scanning technique just described. Unfortunately the process did not work for me as my photos was a bit blurry so they did not transform in to a correct mesh of my face (my head was all distorted and only half of my face did make it to the mesh, so I could not really work with it) so I had to use an already existing scan of a face for the anatomy parts of this week.
The anatomy of a face is rather simple actually. The key parts for the edge-flow grow from the mouth and eyes areas and meet across the nose and on the chin. Around the eyes the edge-flow goes around in circles then meets like a mask that connects both of the eyes (I have only modelled half of the face as it can be mirrored, so you’ll have to imagine the other half of the mesh being identical). For the mouth it gets modelled the same way as for the basic eye edge-flow, that is circles around the mouth, and then reaches out to meet up with the rest of the mesh.
Here you can see the edge-flow for the eyes and the mouth:

Here you can see the edge-flow of the face and how it connects the two parts:
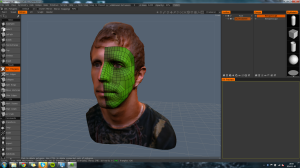
Note: the software used here is a trial of 3d-Coat.
After reading the article on ‘Photogrammetry’ in ‘The Vanishing of Ethan Carter’ I can only say “wow!” these guys really knows how to use photo-scanning as the tool for what it is, and they also really have the time and skills to do it. When we were making our models from photo scanning we used about 9 images for the process (only for the face) while they were using everything from 26 photos up to hundreds or even thousands of photos which resulted in that they got a much higher quality mesh of the object.
Also when we were creating our objects we did it from a living creature (lol. yes I am still alive ;p), and as they state in the article it’s really hard to capture moving objects:
“Photogrammetry gets confused by moving subjects. If you want to scan human face, even tiny head/facial muscles movement between photos means errors in scan and lots of manual cleanup and resculpting.”
But with the right set up, the right settings and the right equipment a perfect shot of a moving object is still possible. So I won’t give up on this technique, it actually really cool and I want to try it out for more complex objects with even more shots trying to capture that perfect mesh of a real life object.
And that’s it for this post, CYA in the next one!
-Lui

Leave a comment