Category Archives: 5SD033
Hello world!
This week has been all about our boss Grubby McGrub. Grubby is a big, fat caterpillar. She glows in creepy orange and yellow and have a witch-like appearance. Her battle is in whack-a-mole style, she will move around under the floor and smash up through the fabrics trying to head-butt you. If she hit you it’s a one hit kill so you really have to look for the cracks appearing right before she comes up. If you’re fast enough and avoid her you better keep on running as she sends out waves of projectiles in a lot of directions.
For concept it’s the same as last week. Måns from my group have done some awesome work on the concept art of Grubby and some key-frames for the animation which makes the star a lot faster and simpler as I don’t have to come up with the basic character myself.
This is the concept I got from Måns…

After receiving Måns concept-art I simply open it up in illustrator and start doing the basic shapes converting his work in to vector graphics. After that I evolve the shapes to a more characteristic look and add colour. While I’m still in Illustrator I do the different frames I will use later for the animation. Illustrator has an awesome feature where you can export your work to Photoshop and keep all your layers. This action simply converts your work in to pixel-graphics and saves them as a .PSD/.PDD for continuing your work in Photoshop. Just make sure the layers you want to have with you are visible while exporting.
When in Photoshop I first of create the basic animation to see that it flows well. If I need I can go back to Illustrator adding more layers for more frames. When the animation flows well I add the glowing effect using the very soft standard brush in Photoshop. (When I draw in Photoshop I almost never use any other brush than the hard and the soft tip standard brush, as with these two you can draw almost anything you want)
This is how Grubby looked like after all the steps up to the glowing one…

When the glowing is added I go on to do the more fluid moves of the character. When I’m in this part of the progress of doing an animation I render the timeline to get each frame as an individual .PNG files and reopen them in Photoshop. I do this as it can be really heavy for the computer to update the frames by selecting new layers and moving them around each tenth of a second ( and sometimes even faster) and that the warping-tool in Photoshop doesn’t support warping multiple layers at once. So to get my animation more lively I simply distort some of the frames slightly creating a very simple moving effect.
When all frames are looking the way I want them to do I scale them down to the in game size to save memory of the computer running our game later. Then I render them out again as .PNGs and pack them up in to a sprite-sheet using sprite-sheet-packer.
This is how She turned out. the crack she creates is going to be on a different sprite-sheet so it doesn’t show on here, but you will see for yourself when playing the game in about one week.( OMG. IT’S SOON DEAD-LINE!!!)

This is basically how I’ve done all our animations for Suit Em’ Up (recently renamed S.W.A.G. lol). So this might mostly seem like a repost but with some steps slightly different as I learn along the way. I can say that I work at least twice as fast now compared to my first animation for this project.
For the problem I had in the post before this one I have now solved it. If you only get broken files out of your exported timeline it’s probably because it’s in repeat mode. So to as simply and fast as possible get your frames out just put all your frames to 1 sec long and the timeline to play once. Then go to File – Export- Render Video… – choose “Photoshop Image Sequence”, set format to “.PNG” and set the frame rate to 1 FPS, then choose where to export too and press Render. TADA! You should now have a map named to whatever your project is called or what you choose to name the rendering, and in this map you should find each individual frame as a .PNG to use in which way you please!
Guess that’s all for this week, until next time take care!
-Ludwig Lindstål
1 Comment | tags: 2D, 5SD033, animation, art, assignment, boss, bug, bugger, character, design, development, drawing, em', fight, First, Game, graphic, graphics, Grubby, ladybugs, McGrubb, Play, productions, progress, Prototype, sheet, Sketch, sprite, Story, Suit, universitet, up, uppsala | posted in 5SD033, school stuff
Hello!
This week I’ve been working on one out of two pre-bosses of our game. His name is Ben Bugger. He is a large blue-ish bug who rolls around on his huge ball of crap trying to roll over you and smash you Indiana jones-style. He also squirts goo all over the place to slow you down, but the smart player will try to kite him in to the goo and slow him down instead.
Here is how he look facing the screen (kind of like a spider-bug lol)…

On this character some concept art and some key frames had already been done by my team-mate Måns Löf, so to starting up this week’s job was much easier than earlier weeks, which is nice since we are behind on the graphics front (we will still make it, no problems, but it won’t be much time left to polish the graphical stuff).
So first of I opened the key frames images in Illustartor so I could start out with the first and basic pose and frame. Using Illustrator is great as you work in vectors making resolution infinite and changing your shapes a whole lot easier. And for the next frame I just copy the moving part to a new layer and change it by a little and work my way through the rest of the frames.
In this animation I aim for a total of 8 frames for the total loop, where the legs uses 4 frames twice and the head all of the frames for a single loop. This gives the illusion of him running and pushing his dearest crap-ball all hysterical and bug-like while his head looks like it tries to find Barney.
When all frames are done I export my Illustrator file to Photoshop to draw the glowing part using an airbrush like brush. After that I create each frame by selecting which layers to show. The layers come and are directly imported from Illustrator making this step really easy and fast.
After that I save each frame as a .png-file. I know I can render a video of the timeline making this step automatically for me, but for some reason the files often comes out corrupted, and when they don’t there are duplet’s in the folder on some frames (I know how to solve the duplets problem though. If I set each frames time to one whole second and choose one FPS in the render options each frame will be exported as individual .png’s) So using render video doesn’t really work for me. If you know why the files are corrupted or have any ideas of hove to solve the problem please write a comment and help me out!!
Last of I make a sprite sheet using sprite-sheet-packer, which is a freeware making it ridiculous fast creating a complete sprite sheet and automatically creates a matching .txt file with coordinates for the programmers to use when the character is animated in the game.
Well that’s all for this week, have a good one!
-Ludwig Lindstål
1 Comment | tags: 2D, 5SD033, animation, art, Ben, Blue, bug, bugger, character, design, development, drawing, em', Game, graphic, ladybug, Play, production, sheet, Shoot, Sketch, sprite, Suit, universitet, up, uppsala | posted in 5SD033, school stuff
Hello!
This week I have been really productive. First of I did finish the last touches on our Bugger, the pink flying bug from last week. The glowing’s looks way better now and he doesn’t look like a flying and buzzing Christmas three anymore (lulz).
Then I did our basic map. To this week we have used a placeholder from our mock-ups so we could have one before the finished graphics were done.
This is how it looked then…

…And this is how it look now!

I think it’s a great improvement. It’s much more different from our customization menu that then was the same suit as the first map but only it’s outlines (two so similar screens in the menu-system should be avoided to not confuse the player. A menu system that is hard to navigate is a bad one, flicking through a game-menu isn’t a gameplay ;)).
Later on I will add how the real world is fitted in this suit to give the exact place and a better view over how the world is built up. As you explore the world in the game more of it will show in the map and finally when you have been everywhere the whole map should give you a completed image over the world making it easy for you to navigate you to wherever you want. But this is a lower priority than animating the two bosses that are left. Hopefully this feature will be added if time allows it, would be really nice!
I have also finished the green Grubling, the grub with a cannon on its back. Now we have animation for movement up and down and not only right and left making it not look so stiff. So right now I’ve made and (by Tomas) implanted three characters in fully four-way animations and directions. This is a really big mile-stone in graphics for our game. If you don’t count with the bosses all character’s to our game is now done.
This is how the sprite-sheet’s turned out and look now…
… the grubling

… the bugger

… Barney’s legs (I know, they seem pretty random running there on their own and it’s just looking ridiculous without the rest of him but this is what you get for now. we have implanted the rest of Barney in the game so don’t worry, it’s only out here it looks this random. he actually looks fine in the game. 5 out of 5 when we asked people who have played it, top ratings Wuu-Huuu!)

The rest of Barney is on another sprite sheet (I’m going to post him in one peace later for you guys to see, don’t worry!). He is built up in parts where his legs are one part, his torso in another, his arms in a third and his head in a last one. We have done it this way so he will look and behave more like a robot in his appearance being able to run, shoot and look in different directions at the same time all according to the players input. It looks and feels way more fun controlling him this way.
Last of work I’ve done this week is that I just started on one of the last bosses, Ben Bugger. He will get a presentation here in my blog next week and you will get an image of how he looks as well. (OMG, it’s almost like a cliff-hanger of my work, lol! and now you have to come back to see how it ends, mohuehuehue!!x))
Well, that’s all! Sorry for not going in to much of details in this blog post and almost just rush through everything so fast even I don’t get what I’ve done, but I’m already like 150 words more than we should write, so have to end it here! CYA!!
-Ludwig Lindstål
1 Comment | tags: 2D, 5SD033, animation, art, boss, character, design, development, drawing, em', Game, graphic, map, sheet, sprite, Suit, universitet, up, uppsala | posted in 5SD033, school stuff
Hello again!
This week I have been working on our melee enemy “the Bugger”. He is a flying mad bug who when he sees you will do anything to head-butt you. His A.I is pretty smart as he tries to see where you’re heading and charges towards that point to cut you off and smash you into little robot pieces which makes him a though opponent.

The main thing I have done this week is doing the moving animation for Buggers in four directions: up, down, and both profile directions (which are the same sprites but flipped vertically). First of I quickly sketched out the basic structure and pose of each of the three directions in Sketchbook Pro. Then I opened these sketches in Illustrator and started to transform the sketches in to coloured vector graphics. Illustrator is great tool mainly because it works in vector graphics, so I don’t have to care about resolution at all. But it is even greater as I can easily change individual shapes at any time in this part of the process and get very clean lines and work with only mouse and keyboard.
After I have transformed Bugger into vectors for the standard pose and his first frame of each direction, I start to pick out which body-parts that should be moving relative to the parts that they are attached too and copy them in to a new layer. In this case everything is mainly connected to his head and then reconnected throughout other body parts .When I have changed a body part a little to create a difference between two frames I copy the changed part to a new layer to change it for the next frame and repeat the process. This results in a smooth moving effect when played fast.
When all the basic frames are finished in Illustrator I export my files to Photoshop. Then in Photoshop I start a timeline and simply choose which layers that should be shown in which frames letting me use many layers more than once. When I can see that the basic animation flows well I add some glow to the bugger giving him his more dramatic and magical appearance. And for a final touch I move him up and down to give the optical illusion that he is flying or floating in mid-air.
There is still some last touches that needs to be done, but this is how he looks for now!
This character is using the same animation for his moving, idle and attacking so all that is left on the Bugger now is his death animation, which is low priority and will be done if time allows it. next week I will work on the other enemy… (feel free to read in dramatic voice, mohahahah!!! lulz) … the Grubling.
Guess that’s all! hare så länge!
-Ludwig Lindstål
4 Comments | tags: 5SD033, animation, art, bug, bugger, develope, em', flying, Game, graphics, ladybugs, Suit, universitet, university, up, uppsala | posted in 5SD033, school stuff
Hello World!
This week I was supposed to help Andreas (which are designer of our game-world) with the graphical parts of our “rooms”. Our game-world/suit is cut into smaller “rooms” so the computer doesn’t need to have the entire world in its memory at once but only loads the room the player is in and the surrounding ones. So, as said, I was supposed to help Andreas with our rooms. But he wanted to go for graphics for our menu system instead so we are going to do the rooms later, this resulted in me not working on one specific artifact this week but several and smaller ones.

Kind of what texture we’re looking for to use in our game. the search will be continued!
Instead for fixing our rooms I did some research after texture for our suit. There are two layers of our world. One inner layer which is the one you will walk around on, and one outer that is the suit’s outside which sets the paths for the labyrinth of our game. I’ve started on some of the textures myself, and will together with Andreas put them in to our rooms, but that will wait for maybe next week or so, simply when we have time for it.

the two enemy’s and all the Barney’s are my work, the rest is concept-art done by Måns from my group
I have also done some improvements on my animations. They are much smoother now and have a more biological appearance. Not as stiff as my first attempt at doing some animation. There are now 4 frames for each leg instead of only two and there is also a lot more details added to the enemy’s. One other thing on our animation-front is that finally we have some added in the real game, we have animation for one of the enemy’s (the green one) and a walking animation for Barney, our main character. So now the game doesn’t look as boring when there is a lot of movement going on, on the screen. We-ho!

This is a mock-up of what we wanted the map to look like, the red dot is where the player is. The map is just a suit due to our aesthetic goal; Exploring. the player will not be given a full map of the suit because it reveals too much and lower the exploring game-play for the player.
Last of random work I did this week was a map for our menu-system. As the programmers was already finished with the code for it and we only needed the map-sprite I thought I could do it as well, since this week already is messed up with random tasks. Since the programmers already are done with the code of the map, I had some very strict rules to follow when making it. I had to draw it over our map, but not lose the proportions of it, nor make it too much offset from the map, which made the map look a bit weird.

This is how i had to do the map. it’s not finished jet but you’ll get the idea.
well. I think that’s all folk, sorry for a very diffuse post…will be better next week!
-Ludwig Lindstål
1 Comment | tags: 2D, 5SD033, animation, em', Game, making, map, progress, Suit, texture, up | posted in 5SD033, school stuff

Hello!
This week I’ve focused on animation for our standard enemy’s. I think they turned out pretty good. There is still lots of details missing on these guys, but for pre-alpha and alpha it will do.
I’ve used Illustrator for drawing these characters (the same way as I drew Barney). The reason for using Illustrator is because of how I built our characters I can easy change the proportion, shape, color etc. of each part of the character which makes it easy to modify. So after the basic character is created I can change every individual part exactly the way I want and by duplicating the layers I can do small variations that later will create an animation. Another reason for using Illustrator is that you can save the work in every resolution you want as Illustrator works with vector graphics. Right now our game is in 1280×720 but if we want to go with higher resolution it requires minimal work from the graphic artists on the characters of our game, which is nice!

To create the animation itself I used Photoshop cs6. As Illustrator allows you to export your files as PSD-files (Photoshop files) I could open my work in Photoshop with all my work and all layers as I left them ( only converted in to pixel-graphics instead of vector graphics as I exported them that way) and from there I created an frame-animation in Photoshop choosing which layers to show in each frame of the animation. To check if the animation look good I loop the frames. How the loop should behave in the code when it’s implanted depends on how the animations frames themselves are done. Right now I have two different types of animation. My green enemy for example is a loop animation, after the last frame the animation starts over from the first frame. My pink enemy is the opposite of a loop animation, after the last frame the animation starts to play backwards, and when it reaches the first frame again it plays normal again creating a pendulum animation (I don’t know if this is what you call them, but i think it makes sense calling them that, lol)
Until now, making a sprite-sheet have been a pain to do. I did save each frame as a separate PNG-file, then reopened them in Photoshop, placed them next to each other in a new Photoshop file, saved the new file and reopened that as well and then scale the new sprite-sheet to fit the game and then save it for the last time. then I had to manually pick out the coordinates for each frame for the programmers so the animation still looks good and doesn’t jump all around. Yesterday Simon showed me a free program making it much easier to convert a frame-animation to finished sprite-sheet with an automatic text document holding the coordinates of each frame. I haven’t tried it for any of our animations yet but it was really easy when i tried it out. This is gonna save me so much time. I’m gonna be at least twice as effective. wo-ho!
Heidoh!
-Ludwig Lindstål
3 Comments | tags: 5SD033, animtaion, em', illustrator, photoshop, sheet, sprite, Suit, up | posted in 5SD033, school stuff
Hellu out there!
We have just started our game development course. The main assignment with this course is to make a game out of the concept from another group from our class. In the end of this course we should have an operating game along with design documents, reports, backlogs, blogging etc.
We have the same groups as in the game analysis course so I’m working with Tomas, Malin, Jonas, Andreas, Måns and Emil. We went for the Suit em’ up concept, which is a space shooter inside a suit that is filled with disgusting bugs, and your mission is to clean the suit up (elevator pitch, lolol). Also I have a new role in our group, I’m the lead graphic artist! WO-HO!
So, as the new graphic dictator, I split up the different parts of the game and handed them out to our graphic artists to them who wanted to work with that part. Emil is working on the menu system, Andreas is working on the world map, Måns is working on sound and GUI, and I’m working with the Character, enemy’s and bosses (which includes a lot of animations, like.. at least 200 tons)
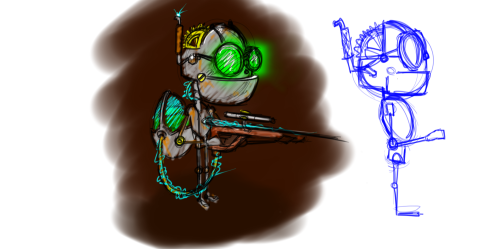
This first week I did some concept art of our hero, and some of the bugs. The hero is called Barney (no, absolutely no Himym references ;P), a tiny robot who is dropped down in the suit. When coming up for a concept about Barney I wanted him to have a personal character, so the player would care more about him even though he’s only a robot. also we are going for a steam punk feeling of the game, so it is obviously why he has some cogwheels and pipes sticking out of his head.
Also as mentioned Barney will be tiny, he will be smaller than enemy’s and a lot smaller than the bosses. This is motivated by one of our aesthetic goal, exposed. The player should not feel very strong or overpowered at the beginning of the game, rather like this is a world with fear of big monster that will crush and eat you when they can.

I did also do a super-fast concept for one of the bug, don’t gonna say much about it. probably it even gonna make it to the game.
well, I hope this gives you a general idea of how we imagine our game to be, and till next until next time, take care!
-Ludwig Lindstål
Leave a comment | tags: 2D, art, concept, development, em', Game, Suit, up | posted in 5SD033, school stuff


